Introduction
In
this article let us try to understand the android basics and learn it's
architecture stack etc. The following topics will be covered in this
article.
•
Brief summary of what Android is how it compares to other mobile
platforms, and why developers should care about developing Android.
•
High-level overview of different layers of Android Architecture stack
(ie. Linux Kernel, Libraries, Android Runtime, Application Framework,
Applications) and components that make up the essential building blocks of an
Android app (i.e. Activities, Services, Broadcast Receivers, Content Providers)
• Bonus section: Intent, Fragment.
Good understanding and knowledge of Java programming is highly recommended.
Brief summary about Android
Android is a Linux based operating system which is specifically designed for smart phones and tablets. It was originally created by Andy Rubin around dawn of the twenty first century. In year 2005, Google acquired a startup named Android Inc. Android is campaigned by google but it’s owned by Open handset alliance (It is a group of 84 technology and mobile companies who have come together in providing a rich, less expensive and better mobile experience). The greatest advantage and benefit of using Android is its completely open source. There are currently large number of devices which supports Android, hence one can develop application and run on various devices which supports Android OS; which in-turn creates a richer ecosystems both for developers and consumers.
The first Android device which came into market was G1 device
manufactured by HTC and provisioned on T-Mobile. As the G1 release date neared,
the Android team released SDK V1.0 and applications began surfacing for the new
platform.
Here’s the pictorial representation of the history of Android OS
Here’s the pictorial representation of the history of Android OS

(Courtesy: Reused and modified image - Mobile OS versions: New statistics
on Android usage)
Now let us see why Android phones are better than other phones in
the market. It all comes down to choices. With Android you can not only run
thousands of apps on your phone but you also have a great choice of choosing
your preferred phone with no monopoly of manufacture or carrier. Today you see
android is being powered by millions of mobile devices in more than 190
countries around the world and there are more than one million android devices
are getting activated each day.
Android and other mobile platforms
Here’s in brief about android and other mobile platforms.

Here are the reasons why Android is better than any other phones
• Multiple devices
• Screen size
• Widgets
• Changeable keyboard
• Deep cross-app integration
• Better User Interface
• Cloud-connected experience
• Price points
• Customization
• Live wallpapers
• Custom launchers
• Custom ROMs
• Speed of improvement
• Screen size
• Widgets
• Changeable keyboard
• Deep cross-app integration
• Better User Interface
• Cloud-connected experience
• Price points
• Customization
• Live wallpapers
• Custom launchers
• Custom ROMs
• Speed of improvement
Why developers should care about developing Android?
Android is growing very rapidly and more than its being open source, developers have full access to Android API’s, they can tweak in if they want and can contribute to the community. Also one can simply use open source tools for developing android apps. Today android applications are everywhere in phones, tablets, microwaves, TV, watch, cars, cameras etc. Hence there is a wide market penetration to the application that one develops. Most of the apps that you develop seamlessly work in various devices and hence you don’t have to worry about targeting your applications to specific devices as the apps are compatible with multiple hardware and OEM suppliers. Android being open and free, there’s a huge opportunity for consumers and developers.
Android Architecture
Now we shall learn about Android Architecture.

Linux Kernel
The Android operating system underneath relies on the Linux 2.6
core for security, memory and process management, network stack and driver
model. This layer consists of various drivers for camera, audio, Wi-Fi etc.
Although the android makes use of Linux kernel, it is not using as it is but
there are some modifications and features have been done on top of the actual
kernel core.
Android Libraries
The
following are the list of Android stack libraries which are exposed as a part
of the application framework
1. FreeType - A high quality portable font engine. Supports bit mapped or vector based formats.
2. SGL - Core library used to provide 2D graphics engine.
3. Libc - The standard C library optimized for Linux-based embedded devices
4. SQLite - It’s a lightweight relation database engine used to store application data.
5. SSL - Secure Sockets Layer cryptographic protocol for secure Internet communications.
6. Khronos Group's OpenGL ES for 3D graphics support.
7. WebKit - For browser support (which is also used in Google's Chrome).
Here’s the following list of core APIs that all android devices support the most.
1. android.view – The android view package contains the core user interface class.
2. android.widget – All widgets are built based on the android view package. The widget classes provides a generic user-interface elements which are created so that one can reuse them in their applications which include lists, buttons etc.
3. android.os – Consists of the operating system package which one can make use it to debug an application, tracing, messaging, control power state of the device, tools for managing operating system process etc.
4. android.util – The android util package consists of low-level classes for string formatters, access to event log, read and write JSON, XML parsing utilities, time utilities etc.
5. android.graphics - The android graphics API consists of the low-level graphics classes that support canvases, colors, and drawing primitives. It lets you draw on canvases.
6. android.text – This package contains the text processing tools which can be used for displaying and parsing text.
7. android.database – The database package consists of
database utilities which contains methods to deal with database and cursors.
Sqlite is the default database that android provides which one can make use of
it to store some private data. Also contains specialized classes to deal with
content providers.
8. android.content – The content package consists of classes for accessing and publishing data on device. Also provides services for managing resources, content sharing, and package management.
9. com.google.android.maps – The google android maps package provides access to native map controls that one can use within the application. This includes the MapView control as well as the Overlay and the MapController classes used to annotate and control embedded maps.
10. android.app – The app package consists of high-level package that provides access to the application model. This includes Activity and Service APIs.
11. android.provider – The provider package provides access to standard Content Providers such as calender, media, contacts etc. You can make use of the classes with this package to add or remove data from the pre-defined content providers.
12. android.telephony – The telephony APIs give you the ability to directly interact with the device’s phone stack. Provides access to telephony services and lets you to make, receive, and monitor phone calls, phone status, and manage SMS.
13. android.webkit - The WebKit package provides APIs for working with Web-based content. Includes a WebView control for embedding browsers in your activities and a cookie manager (used for managing the cookies used by an application's WebView instances).
14. android.security – This package facilitates access to some of the android security subsystem. Contains handle of classes that one can make use it to access private keys.
15. android.network – This package contains specialized classes for handling network access (which are not in standard java network package)
Android Runtime
The android applications and the underlying framework that you see today are almost written in Java. But unlike java which makes use of JVM that is the Java virtual machine for running the application, Android makes use of runtime virtual machine named Dalvik. It’s specialized and designed to run on small devices and is not compatible with JVM.
One of the key differences between JVM and Dalvik virtual
machine (DVM) is, Dalvik is a register based virtual machine was as JVM is a
stack based virtual machine. Dalvik is optimized to run on small devices with
less RAM, slow CPU. Also it ensures that multiple applications can run
simultaneously with efficiency into consideration. Note - The Dalvik makes use of
underlying Linux for threading and memory management.
Introducing a new android runtime named ART with Android 4.4.
With the new run time, ART compile the application into native code when
installed on the device. Application that runs under new android runtime
significantly improves the performance because it eliminates the JIT the just
in time compilation each time when the application runs. Note – With ART, the
application slightly takes some time to get installed but there is a
significant gain compared to application running under Dalvik.
Key features of ART
1. Ahead of time (AOT) compilation – The new runtime ART introduces a new improved mechanism to compile the application to native code when you are installing the apps for the first time. This significantly improves the application performance as there won’t be a need for just in time compilation and running of the application. Please note, the ART has tighter install time verification than Dalvik but its only time only. The ART makes use of a tool named dex2oat tool to compile the application on device. It accepts *.dex files as input and generates a machine executable code.
1. Ahead of time (AOT) compilation – The new runtime ART introduces a new improved mechanism to compile the application to native code when you are installing the apps for the first time. This significantly improves the application performance as there won’t be a need for just in time compilation and running of the application. Please note, the ART has tighter install time verification than Dalvik but its only time only. The ART makes use of a tool named dex2oat tool to compile the application on device. It accepts *.dex files as input and generates a machine executable code.
2. Improved garbage collection - With Dalvik,
there were two pauses and it was taking 10 milliseconds to complete the garbage
collection were as in ART; it takes one pause and completes the GC process
under 2 milliseconds. Also the full GC happens only when the phones is locked
and in cases were the user interaction responsiveness is no longer important.
The ART makes use of an entirely new memory allocator named Rosalloc as opposed
to Doug Lea’s design which has a single global memory lock. With Rosalloc,
smaller objects are allocated in a thread local region with no locks and the
larger objects have their own locks. Hence when the application attempts to
allocate a memory for new objects, it does not have to wait for the garbage
collector to free unrelated region of memory.
Application Framework
The application framework is a rich environment which provides
all sorts of API’s that one can make use of to develop an android based
application. This layer of the android stack is highly document to allow
developers to understand and make use of the API’s effectively build innovative
application and bring fantastic apps to market. As we know android provides an
open development platform so developers have all access the same framework
API’s that other core applications are making use of. Developers are free to
take advantage of application framework API’s say running background services,
set alarms, notifications, access location information etc.
Activity Manager – Activity manager is a very important
component of an application framework which is mainly responsible for managing
the life cycle of the application.
Content Providers – The content providers manage the data
sharing between the applications.
Location Manager – The location manager manages does the
location management using GPS or cellular tower.
Package Manager – The package manager keeps track of the
applications that are installed on the device.
Telephony Manager – Telephony manager provides access to
the telephony services on the device. Applications can make use of it to access
information such as subscriber information, phone network type etc.
Resource Manager – The Resource manager is manages the
various resources that are used in the application.
Notification
Manager –
The Notification manager is responsible for displaying custom alerts on status
bar.
Applications
It’s a top most layer of the android architecture. This is our
all our applications that we build will fit together in applications layer. As
a developer you have all access to the API’s for building the applications. All
applications are written in Java language. Below are some of the examples
of pre-existing applications which comes in all android devices.
• Web browser
• SMS client
• Dialer
• Contact manager
Essential building blocks of an Android App
• Web browser
• SMS client
• Dialer
• Contact manager
Essential building blocks of an Android App
Now let us try to understand the essential building blocks of an
android app.
Activities
An activity is a single screen with a user interface in an application. For example, an email application with multiple activities one for showing up all the list of emails, when the user clicks on compose button, there can be another activity to compose an email. Also say if the user clicks on one of the email item, there could be an activity for reading emails. In general every application that you see were there’s a user interaction; you will see at least one activity. An application can have multiple activities were the transition between the activities are handled by intents which we will see next.
An activity is a class which itself is a subclass from
android.app.Activity . All activities are controlled by onXXX() methods.
onCreate() – It’s an initial method to set up an
Activity.
onStart() - This method
gets called when the activity becomes visible to the user. It gets called again
when the activity gets stopped and restarted.
onResume() - This method is called if the Activity
is visible in the foreground and ready to get and process user input.
onPause() - When the activity goes out focus the onPause method gets called. The method has to quickly save uncommitted data and stop CPU intensive work to prepare the Activity to lose the focus and going to background.
onStop() – When the activity looses focus, this method gets called in order to release all the resources. here's the place one should release all the memory for the resources that's being used for the application.
onRestart() - This method has to restore a previously saved state of the Activity, as it is called after an activity was completely stopped and is needed again.
onDestroy() – This method gets called when an activity is about to get destroyed.
Here’s a flow chart explains the activity life cycle.

Now let us try to
understand how activity really works with a simple example. Here in this
example, to begin with we will be creating a simple basic android app with an
empty activity. Our activity consists of a WebView control. You can either use
a widgets editor, drag and drop the WebView control on to you activity or you
can do that with in the XML just by adding the below lines.
<WebView
android:layout_width="wrap_content"
android:layout_height="wrap_content"
android:id="@+id/webView"
android:layout_alignParentTop="true"
android:layout_alignParentStart="true"
android:layout_alignParentBottom="true"
android:layout_alignParentEnd="true" />

Here's the code snippet
of the activity class file. You will notice all the override functions which
gets triggered as a part of the activity life cycle.
As per the life cycle of the activity, When you run this application and then activity gets started, the onCreate method gets called. We will be loading our view that's the layout file for this activity by making a call to setContentView. Then, we will be getting a reference to our WebView control by making a call to findViewById passing in the webView Id. Once we get the WebView, we can load the url. Here I have set the web URL based on the strings.xml. The onCreate is the first callback which happens in the activity lifecycle, you can think of it as a initialization phase were the objects for the activity gets created and the layout projection happens.
public class FirstActivity extends Activity {
private WebView oWebView;
@Override
protected void onCreate(Bundle savedInstanceState) {
super.onCreate(savedInstanceState);
setContentView(R.layout.activity_first);
oWebView = (WebView)findViewById(R.id.webView);
oWebView.loadUrl(getString(R.string.CodeWebURL));
}
/** Called when the activity is about to become visible. */
@Override
protected void onStart() {
super.onStart();
Toast.makeText(getApplicationContext(), "Inside onStart", Toast.LENGTH_LONG).show(); }
/** Called when the activity has become visible. */
@Override
protected void onResume() {
super.onResume();
Toast.makeText(getApplicationContext(), "Inside onResume", Toast.LENGTH_LONG).show();
}
/** Called when another activity is taking focus. */
@Override
protected void onPause() {
super.onPause();
Toast.makeText(getApplicationContext(), "Inside onPause", Toast.LENGTH_LONG).show();
}
/** Called when the activity is no longer visible. */
@Override
protected void onStop() {
super.onStop();
Toast.makeText(getApplicationContext(), "Inside onStop", Toast.LENGTH_LONG).show();
}
/** Called just before the activity is destroyed. */
@Override
public void onDestroy() {
super.onDestroy();
Toast.makeText(getApplicationContext(), "Inside onDestroy", Toast.LENGTH_LONG).show();
}
}
Just after the onCreate() callback, the onStart() gets called.
Just to understand the entire lifecycle, we just display a Toast message
stating that we are inside the onStart method.
When some other activity gets active and focused, the current activity gets out of focus and the onPause method gets called. Say when you are running this application on emulator or on device, just hit the home button, you will see a Toast message stating "Inside onPause". The onStop method will also gets invoked immediatly after the onPause because of the home button pressed, the current activity completely looses its focus. You should be able to see "Inside onStop" Toast message.
Here's when the onResume() callback gets called. Say you are running this application on your device, you are getting a phone call, it will show up on the screen before that the running activity gets into pause state. After you receive or cancel a call, our activity sample app goes to foreground and the onResume() gets called back immediatly. You should be able to see "Inside onResume".
When the activity is onStop state and say if the activity comes foreground when the user navigates to the activity, in such cases a onResume() callback happens and furthur it makes a call to oStart(). Say if the activity does not come to foreground, the onDestory() method gets called and you should be able to see a toast message "Inside onDestroy". Note - The onDestroy is called when the activity is finishing and this happens when the finish() method is called on the activity or the onDestroy is also called when the system is temporarily destroying the instance of the activity to save space.
Here's the snapshot of our activity sample application.

Services
Android services are those components that run in the background without a direct user interaction. All services in android have no user interfaces. They are not bounded by the activity life cycle. Here’s where you can think of services could be used, for example if you wish to perform some long running operations such as downloading music or checking for new data etc. or say if you wish to update content providers in such cases we can easily make use of services. Services always run with a higher priority than inactive or invisible activities and therefore there is less likely android system terminates them. Note - All services are implemented by sub classing the Service class.
Unbounded: The unbounded services are completely independent. Meaning ones the unbound service gets started for the Activity that called it and there is no communication or interaction between them. The Service gets started by using startService, does its job and stops by using stopService without the Activity noticing anything.
Bounded: The bounded service offers communication and interaction between the service and the activity that launched the service. The Activity can at any moment monitor the status or the progress of the background task that the Service is performing by using Messagers and BroadcastReceivers. Multiple components can bind to the service but when all of them unbind, the service gets destroyed.

onCreate() - Called one time when the service is
first started. This is where initialization code should be implemented.
onStartCommand() - The system calls this method when another component, such as an activity, requests that the service be started, by calling startService(). If you implement this method, it is your responsibility to stop the service when its work is done, by calling stopSelf() or stopService() methods.
onBind() – This method gets called when another component wants to bind with the service by calling bindService(). If you are implementing this method, then you must provide an interface that clients can use to communicate with the service, by returning an IBinder object. You must always implement this method, but if you don't want to allow binding, then you should return null.
onUnbind() – This method gets called when all clients have disconnected from a particular interface published by the service.
onRebind() - This method gets called when new clients have connected to the service, after it had previously been notified that all had disconnected in its onUnbind(Intent).
onDestroy() – This method gets called when the service is no longer used and is being destroyed. If you wish to perform some clean up any resources such as threads, registered listeners, receivers, etc. then you must implement this method.
Now let us see with an example how to implement an android
bounded service. We will be implementing a small Location tracker application.
To begin with, we are going to create a Location Tracker Service. Let us
implement the service to get the location (latitute and longitude) based on two
providers - GPS and Network. The following are the
permission that's required for our application. Note - Please make sure to
enable GPS on your phone to get the GPS location readings.
<uses-permission android:name="android.permission.ACCESS_FINE_LOCATION" />
<uses-permission android:name="android.permission.INTERNET" />
Once you create a new project, you can add a
new service as shown below. It's fairly simple to add a new android service. We
will later see how to implement a location service.

Upon adding a new service, it adds an entry in
manifest file. Here in my case, I have added a new service and name as
"LocationTracker"
<serviceandroid:name=".LocationTracker"
android:enabled="true"
android:exported="true" >
</service>
We will be making use of LocationManager to get location (GPS or Network). Let us implement LocationListener for our LocationTracker service so that we can keep tracker of the location implementing onLocationChanged method.Let us start implementing the onCreate() method of LocationTracker service. Here's the code snippet for the same. All we do is get the LocationManager instance by location service.@Override public void onCreate() { manager = (LocationManager)getSystemService(LOCATION_SERVICE); Log.i(LocationTrackerService, "Location Tracking Service Running..."); }Next let us create two methods for starting and stopping the LocationTracker service. Below is the code snippet for the same. Here's what we do.1. Check whether the GPS Provider is enabled. If not display a Toast message stating "Please enable gps settings".2. Display a message so that the user will know the Location Tracker service is started.3. Request location updates based on GPS Provider with a minimum time in milliseonds (30000 in our case) , minimum distance i.e 0. The last parameter is the listener that's "this" in our case because our service by itself implements LocationListener.4. Next, get the Location by making a call to getLastKnowLocation passing in the provider (GPS).5. Say for some reason the location is returned as null, try displaying location info based on the Network location. Else we are going to make a call to DisplayGPSorNetworkLocation to show the GPS provider location.if(!manager.isProviderEnabled(LocationManager.GPS_PROVIDER)) { Toast.makeText(this, "Please enable gps settings!", Toast.LENGTH_SHORT).show(); return; } Toast.makeText(this, "Starting Location Tracker", Toast.LENGTH_SHORT).show(); manager.requestLocationUpdates(LocationManager.GPS_PROVIDER, 30000, 0, this); Location location = manager.getLastKnownLocation(LocationManager.GPS_PROVIDER); if(location !=null) { Log.d("GPS", "GPS Location"); DisplayGPSorNetworkLocation(location); } else{ DisplayNetworkLocation(); } isTracking = true; } public void stopTracking() { Toast.makeText(this, "Stopping Location Tracker", Toast.LENGTH_SHORT).show(); manager.removeUpdates(this); isTracking = false; }
public void startTracking() {Here's the code snippet to show location information based by Network Provider. Note - The below code looks quite similar to the above code where we retreived location based on the GPSProvider. The only difference you see in the below code is, the location manager gets location by NETWORK_PROVIDER.private void DisplayNetworkLocation(){ manager.requestLocationUpdates( LocationManager.NETWORK_PROVIDER, MIN_TIME_BETWEEN_UPDATES, MIN_DISTANCE_CHANGE_FOR_UPDATES, this); Log.d("Network", "Network Location"); if (manager != null) { Location location = manager.getLastKnownLocation(LocationManager.NETWORK_PROVIDER); if (location != null) { DisplayGPSorNetworkLocation(location); } } }Here's the code snippet to display Location information as a Toast Message. The code is straight forward; we will be formatting the latitude and longitude values and display the same.private void DisplayGPSorNetworkLocation(Location location){ String latitude = String.valueOf(location.getLatitude()); String longitude = String.valueOf(location.getLongitude()); String sLocation = String.format("Lat: %s, Long: %s", latitude, longitude); Toast.makeText(this, sLocation, Toast.LENGTH_SHORT).show(); }Next, we will be implementing onLocationChanged method to handle the change in location. Here's the code snippet for the same.public void onLocationChanged(Location location) { Log.i("TrackerService", "Location changed"); if(location !=null) DisplayGPSorNetworkLocation(location); else DisplayNetworkLocation(); // We shall display Network Location By Default }
@OverrideIf you have noticed, we have started implementing the service as a bounded one. Now we shall implement the code for the same. Below is the code snippet for the same. We need to override the onBind() method to return a binder instance. We will be creating a class named TrackerBinder by extending Binder and we will be returning the same in onBind() method. Note - The TrackerBinder has a method getService(), we will be usingthe same within our activity class.public class TrackerBinder extends Binder { LocationTracker getService() { return LocationTracker.this; } } private final IBinder binder = new TrackerBinder(); @Override public IBinder onBind(Intent intent) { return binder; }Now let us take a look into how to make use of our LocationTracker service with in our Activity class. Here's the code snippet for our Location tracking activity. It has two buttons one for starting and the other for stopping the LocationTracker service.xmlns:tools="http://schemas.android.com/tools" android:layout_width="match_parent" android:layout_height="match_parent" android:paddingLeft="@dimen/activity_horizontal_margin" android:paddingRight="@dimen/activity_horizontal_margin" android:paddingTop="@dimen/activity_vertical_margin" android:paddingBottom="@dimen/activity_vertical_margin" tools:context=".LocationActivity"> <Button android:layout_width="wrap_content" android:layout_height="wrap_content" android:text="Start Location Tracking" android:id="@+id/btnStartLocationTracking" android:layout_alignParentTop="true" android:layout_centerHorizontal="true" android:layout_marginTop="174dp" /> <Button android:layout_width="wrap_content" android:layout_height="wrap_content" android:text="Stop Location Tracking" android:id="@+id/btnStopLocationTracking" android:layout_marginTop="63dp" android:layout_below="@+id/btnStartLocationTracking" android:layout_alignStart="@+id/btnStartLocationTracking" /> </RelativeLayout>
<RelativeLayout xmlns:android="http://schemas.android.com/apk/res/android"Now we will see the code behind of our Location Activity class.Below is the code snippet for the same. Here's what we do.1. We will be using findViewById and passing in the start and stop location tracking button id and get a reference the buttons so that we can implement OnClickListener and make a call to onButtonClick method which will either start or stop the LocationTracker based on the button id. Note - We need to create an intent in order to start and stop our LocationTracker service. This is must else we won't be able to handle our application on Resume and Pause state of our activity.@Override protected void onCreate(Bundle savedInstanceState) { super.onCreate(savedInstanceState); setContentView(R.layout.activity_location); startButton = (Button)findViewById(R.id.btnStartLocationTracking); startButton.setOnClickListener(new View.OnClickListener() { public void onClick(View v){ onButtonClick(v); } }); stopButton = (Button)findViewById(R.id.btnStopLocationTracking); stopButton.setOnClickListener(new View.OnClickListener() { public void onClick(View v){ onButtonClick(v); } }); serviceIntent = new Intent(this, LocationTracker.class); }Below is the code snippet to handle the start and stop location tracking button click event.public void onButtonClick(View v) { switch(v.getId()) { case R.id.btnStartLocationTracking: locationTrackerService.startTracking(); break; case R.id.btnStopLocationTracking: locationTrackerService.stopTracking(); break; default: break; } }Now let us see the onResume and onPause activity implementation. Below is the code snippet for the same. onResume, we will be starting our LocationTracker service by making a call to startService and passing in our serviceIntent instance and then we will be making a call to bindService so that we are going the activity gets bind with our LocationTracker service.OnPause of the activity, we will be stopping our LocationTracker service and making a call to un bind the service passing in the locationServiceConnection instance.@Override public void onResume() { super.onResume(); startService(serviceIntent); bindService(serviceIntent, locationServiceConnection, Context.BIND_AUTO_CREATE); } @Override public void onPause() { super.onPause(); if(!locationTrackerService.isTracking()) { stopService(serviceIntent); } unbindService(locationServiceConnection); }The above code, bindService makes use of a ServiceConnection instance. Below is the code to obtain the ServiceConnection instance. Note - You will see below, after the service gets started, the onServiceConnected method of ServiceConnection instance gets called and we are making a call our LocationTracker service, getService() method to get a reference to our location tracking service so that we can start and stop the same with in the activity.private ServiceConnection locationServiceConnection = new ServiceConnection() { public void onServiceConnected(ComponentName className, IBinder service) { locationTrackerService = ((LocationTracker.TrackerBinder)service).getService(); } public void onServiceDisconnected(ComponentName className) { locationTrackerService = null; } };
Broadcast Receivers The broadcast receivers are used whenever you wish to know about system wide events. A class must extend BoradcastReceiver and implement onReceive() method in order to receive notifications. Here is some of the real world examples were the Broadcast receivers are being used. • Battery Widget Reborn makes use of the ACTION_BOOT_COMPLETED event to display the notification icon containing the current charge level of your device. • AirDroid makes use of the CONNECTIVITY_ACTION event for its widget to display established WIFI connections. Below are two types of broadcasts. Unordered broadcasts – These broadcasts are completely asynchronous. All receivers of the broadcast are run in an undefined order, often at the same time. Ordered broadcasts – These broadcast messages are delivered to one receiver at a time. As each receiver executes in turn, it can propagate a result to the next receiver, or it can completely abort the broadcast so that it won't be passed to other receivers. In order for the broadcast receivers to work, one has to do two important things. 1. Create a broadcast receiverCreating a broadcast receiver can be easily done by creating a class that extends BroadcastReceiver then we need to override the onReceive() method to handle the broadcast message. Here’s an examplepublic class SmsBroadcastReceiver extends BroadcastReceiver { @Override public void onReceive(Context context, Intent intent) { Bundle bundle = intent.getExtras(); SmsMessage[] messages = null; String message = ""; if (bundle != null) { Object[] pdusArray = (Object[]) bundle.get("pdus"); messages = new SmsMessage[pdusArray.length]; for (int i=0; i< messages.length; i++){ messages [i] = SmsMessage.createFromPdu((byte[])pdusArray [i]); message+= messages [i].getMessageBody().toString(); message += "\n"; } Toast.makeText(context, message, Toast.LENGTH_SHORT).show(); } } } 2. Register a broadcast receiver<application android:icon="@drawable/ic_launcher" android:label="@string/app_name" android:theme="@style/AppTheme" > <receiver android:name=" SmsBroadcastReceiver "> <intent-filter> <action android:name="android.provider.Telephony.SMS_RECEIVED" /> </action> </intent-filter> </receiver> </application>Content ProvidersIn general all android applications run on its own process and all the data that the application stores will be maintained local to that application and is hidden from other applications. But sometimes you wish to access some of the shared data or you want your other applications to access your application data, in such cases the content providers come in handy. The content providers acts as centralized repository and allows access to other applications based on the permission. The content providers are used to share data between multiple applications assuming the application has right permission to access data. All applications have access to content providers through ContentResolver and that’s being said the applications don’t have a direct access to content providers. Android ships number of content providers for common data types like Audio, Video, Images, Personal contact information etc. The following are the list of useful built in content providers. 1. Browser – Browser bookmarks, history etc. 2. CallLog – Missed calls, call details etc. 3. Contacts – Contact details. 4. MediaStore – Media files such as audio, video and images. 5. Settings – Device settings and preferences. Here is the list of methods which you need to override in Content Provider class to have your Content Provider working. onCreate() - This method is called when the provider is started. query() - This method receives a request from a client. The result is returned as a Cursor object. The contents can be queried using the content:// uri scheme.The URI should look something like this content://authority/optionalPath/optionalId.insert() - This method inserts a new record into the content provider. delete() - This method deletes an existing record from the content provider. update() - This method updates an existing record from the content provider. getType() - This method returns the MIME type of the data at the given URIHere’s in pictorial representation of interaction of activities with content resolvers and content providers. You can notice there are multiple applications interacting with the common data storage through content providers.Let us see with a simple basic example to understand how the content providers work?Here's a smaple application which makes use of contacts content providers to fetch all the phone contacts. Let us say our app contains a button; onclick on that button, it should display all the phone contacts in a List box.First let us see what all packages we need inorder to code this sample.We need to have a ContentResolver, through which we can get contacts. Also we need a cursor to iterate over the contacts. Also we will be importing ContactsContract package, it contains some of the contact constants that's required to code our sample app.import android.content.ContentResolver; import android.database.Cursor; import android.provider.ContactsContract;The following are the view and widget packages that's required as we are making use of a Button and Listview controls. We need also handle onclickimport android.view.View; import android.view.View.OnClickListener; import android.widget.Button; import android.widget.ListView;Let us start building an Activity class to show up all the contacts. Here's the code snippet for the same. Let us see how the code works ?onCreate of ContactsList Activity, we will get an handle to our "Click to Display Contacts" button and then we will register the onClickListener to make a call to DisplayAllContacts() function.Here's what happens with in the DisplayAllContacts() function.1. First we will get the ContentResolver instance so that we can query the contacts.2. Create a cursor by making a call to ContentResolver instance's query method with the CONTENT_URI. The content resolver always requires a URI to query the contents.3. Using cursor and looping through until we have contacts, we will get the contact id and name.4. We have to check whether the given contact has a contact number. if so then we have to furthur make use of content resolver to query the contacts with the specific id so that we obtain a contact number by contact id.5. There may be one or more contacts for the specific contact id, so we loop through and add name and phone number to a string collection, which we will be using it to display the contact information in Listview control.public class ContactsList extends Activity { @Override protected void onCreate(Bundle savedInstanceState) { super.onCreate(savedInstanceState); setContentView(R.layout.activity_contacts_list); Button viewContacts = (Button)findViewById(R.id.viewButton); viewContacts.setOnClickListener(new OnClickListener() { public void onClick(View v){ DisplayAllContacts(); } }); } private void DisplayAllContacts() { List<String> values = new ArrayList<String>(); ContentResolver cr = getContentResolver(); Cursor cur = cr.query(ContactsContract.Contacts.CONTENT_URI, null, null, null, null); if (cur.getCount() > 0) { while (cur.moveToNext()) { String id = cur.getString(cur.getColumnIndex(ContactsContract.Contacts._ID)); String name = cur.getString(cur.getColumnIndex(ContactsContract.Contacts.DISPLAY_NAME)); if (Integer.parseInt(cur.getString( cur.getColumnIndex(ContactsContract.Contacts.HAS_PHONE_NUMBER))) > 0) { Cursor pCur = cr.query( ContactsContract.CommonDataKinds.Phone.CONTENT_URI,null,ContactsContract.CommonDataKinds.Phone.CONTACT_ID +" = ?",new String[]{id}, null); while (pCur.moveToNext()) { String phoneNo = pCur.getString(pCur.getColumnIndex(ContactsContract.CommonDataKinds.Phone.NUMBER)); values.add(String.format("%s - %s", name, phoneNo)); } pCur.close(); } } final ListView listview = (ListView) findViewById(R.id.listView); final StableArrayAdapter adapter = new StableArrayAdapter(this,android.R.layout.simple_list_item_1, values); listview.setAdapter(adapter); } } }We need to create an adapter to display the content in a listview control. Here's the code snippet for building the Adapter. Once you have our adapter class, we can build an adapter with the contacts collection and then we can set the adapter for our listview so that it can render all the contact information.public class StableArrayAdapter extends ArrayAdapter<String> { HashMap<String, Integer> oHashMap = new HashMap<String, Integer>(); public StableArrayAdapter(Context context, int textViewResourceId, List<String> objects) { super(context, textViewResourceId, objects); for (int i = 0; i < objects.size(); ++i) { oHashMap.put(objects.get(i), i); } } @Override public long getItemId(int position) { String item = getItem(position); return oHashMap.get(item); } @Override public boolean hasStableIds() { return true; } }When you run through the above sample app on emulator, you will see the below snapshot. You won't be able to display contacts but I'm just showing it to have a feel about the look and feel of the app.You can download the sample Contacts Application and deploy the same on your phone and tablet to see how it works.Intent
Let us start understanding the meaning of intent in a simple English term; intent is nothing but an action or purpose. Intent in android is nothing but an abstract description of the action that needs to be performed when it’s being used.Underlying the intent is a java class. It is one of the powerful concept as it allows one to create a loosely coupled application. You can use intent to communicate between the activities with in your application or any of the application component installed on the device. Here’s in high level were exactly you can make use of an intent. 1. You want to start or launch another activity from within an activity; you can make a call to startActivity with intent as a parameter. 2. Say you wish to broadcast a message. With the help of broadcastIntent, you can send intent so that all broadcast receivers matching this intent will receive the broadcast. 3. You can use intent to communicate with your background service using startService or bindService.Intent can be explicit or implicit. Now we will see what it means. An explicit intent always targets a specific intent which means you will have to specific an activity to be called while creating intent. In below snapshot you will see the usage of an explicit intent to SecondActivity from the MainActivity. This is just an example to show the big picture of an explicit intent.With implicit intents, the intent does not specify the activity but instead we need to only specify the action. There are pre-defined actions in the system that one can make use of it while creating intent.Here’s an example:Action: ACTION_VIEW Data: content://contacts/people/1 The above action can be used to display information about the person whose identifier is "1". Action: ACTION_DIAL Data: content://contacts/people/1 The above action can be used to display the phone dialer with the person filled in. Let us see with an example of the usage of explicit and implicit intents. In this sample application we are going to create two activities. Below is the code snippet of manifest xml file. You will notice below the intent-filter with an action set to MAIN is being applied to “Activity1”. You can always apply an intent filtering with in the manifest file.<?xml version="1.0" encoding="utf-8"?> <manifest xmlns:android="http://schemas.android.com/apk/res/android" package="com.example.abtech.hellointent" > <application android:allowBackup="true" android:icon="@drawable/ic_launcher" android:label="@string/app_name" android:theme="@style/AppTheme" > <activity android:name=".Activity1" android:label="@string/app_name" > <intent-filter> <action android:name="android.intent.action.MAIN" /> <category android:name="android.intent.category.LAUNCHER" /> </intent-filter> </activity> <activity android:name=".Activity2" android:label="@string/title_activity_activity2" > </activity> </application> </manifest>Now let us create intent to start another activity. Here’s the code snippet for the same. You will notice below the intent instance is created with the activity to be called. Also you can pass in some data with intent by making a call to putExtra method with a name and value.Intent intObj = new Intent(Activity1.this, Activity2.class); intObj.putExtra("name", message); startActivity(intObj);


Here’s a code snippet of Activity2 onCreate method were we are showing a Toast message with the name we are trying to retrieve it from the intent.@Override protected void onCreate(Bundle savedInstanceState) { super.onCreate(savedInstanceState); setContentView(R.layout.activity_activity2); Intent intentObj = getIntent(); String userName = (String) intentObj.getSerializableExtra("name"); Toast.makeText(getApplicationContext(), "Welcome - " + userName, Toast.LENGTH_LONG).show(); }Here’s an example of an implicit intent. You can notice below an intent is being creating without passing is parameters like activity. The action is set to dial indicating that we are trying to dial a phone number with the data that’s being set by making a call to setData of intents. In our case we are dialing a number 911. (Please don’t try to make a call this number. It’s just an example)Intent intent = new Intent(); intent.setAction(Intent.ACTION_DIAL); intent.setData(Uri.parse("tel:911")); startActivity(intent);Fragment
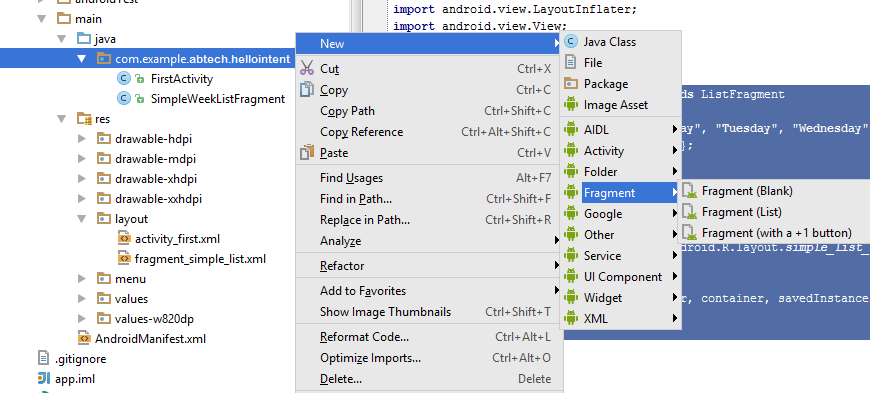
A fragment is a reusable independent component that one use of in activities. It is a part of the user interface. You can think of fragment as a sub activity, having its own life cycle. The concept of fragments was introduced in Honeycomb API 11. If you are wondering is there a way to use fragments in older devices, yes you can make use of a Support library so that your app remains compatible with the older devices. It supports up to Android 1.6. A fragment generally has its own user interface but you could have a UI less fragments too; the beauty of fragments is they are reusable. Meaning you can develop one can use the same in multiple activities. You can just add or remove a fragment at any point when the activity is running. Here we will see an analogy to understand about fragments. Consider an example of a user control or server control or any component that you wish to use in a web technology. You are going to use them by adding the same in your web page. These can be considered as static fragments with in an activity. While building a dynamic or a modern user interfaces, one has to make use of fragments. You can add them to the activity either dynamically or statically when the activity gets started. Here’s the big picture of the usage of fragments in tablet and phone.Courtesy image - DEVELOPERIf you are still thinking why do we need a fragment? Good question and here are the answers.1. Reusability. You can create a fragment and reuse the same in multiple activities. 2. To make better use of larger screen space on tablets. Image if you have a single activity with no fragments, in such cases you would not be effectively using the whole tablet screen. 3. Support different screen layouts. Portrait vs Landscape modes. You can show and hide the fragments based on the screen orientation.High level view of a fragment lifecycle onAttach() - The fragment instance gets associate with an activity instance. onCreate() - The fragment is created. onCreateView() - The fragment View hierarchy is created and it becomes part of the view hierarchy of its containing activity. onActivityCreated() - At this point both the fragment and the activity has been created. You can access the view by using findViewById(). onResume() - The fragment becomes visible and active. onPause() – The fragment becomes visible but not active. onStop() – The fragment becomes invisible.Let us now take a look into an example to see a simple week list fragment can be coded. Note – Although the example looks trivial, I have code this one so that you will understand the basics of building fragment. First let us create a new project, consisting of a default single activity. You can add a new fragment as shown below to get started in building a simple fragment week list.Here’s the code snippet our week list fragment. We will be overriding the onCreateView and make use of an ArrayAdapter passing in the required layout and weeks collection and in the end, we will make a call to setListAdapter which is used to populate the list control. You can notice below, out week list fragment itself gets extended from ListFragment. In general you will always see a fragment getting extended from a base class Fragment.public class SimpleWeekListFragment extends ListFragment { String[] weeks = new String[] { "Monday", "Tuesday", "Wednesday", "Thursday", "Friday", "Saturday", "Sunday"}; @Override public View onCreateView(LayoutInflater inflater, ViewGroup container,Bundle savedInstanceState) { ArrayAdapter<String> adapter = new ArrayAdapter<String>(inflater.getContext(), android.R.layout.simple_list_item_1,weeks); setListAdapter(adapter); return super.onCreateView(inflater, container, savedInstanceState); } }Now let us see how we can add the above week list fragment to our activity. Below is the code snippet for the same. You can notice below when the savedInstanceState is null, using FragmentManager we are going to add our fragment to the root of our activity and commit the same.public class FirstActivity extends Activity { @Override protected void onCreate(Bundle savedInstanceState) { super.onCreate(savedInstanceState); setContentView(R.layout.activity_first); if (savedInstanceState == null) { FragmentManager fragmentManager = getFragmentManager(); SimpleWeekListFragment weekList = new SimpleWeekListFragment(); fragmentManager.beginTransaction().add(android.R.id.content, weekList).commit(); } } }ReferenceThe Android Libraries section is elaborated based on the inspiration from WroxProfessionalAndroidApplicationDevelopment highly recommend this book for beginners. Due respect to the life cycle diagrams, which I had created based on the inspiration of the existing images from tutorialspoint android-app-market Android development made me very exciting. I really hope there's a great future for Android because it's open.


Comments
Post a Comment